


Basic Four of Accessibility
‹ BackTable of Contents
Why the Basic Four?
Understanding the Basic Four
Further Training
Why the Basic Four?
Because sections 504 and 508 of the Rehabilitation Act of 1973 and the Americans with Disabilities Act of 1990 protect people with disabilities from discrimination and establish their civil rights, educational institutions like KSU are required to ensure that the resources they provide their students, including electronic resources, are accessible to people with disabilities.
One way that institutions like ours address accessibility is with departments like Student Disability Services (SDS). SDS works with individual students to create plans to support them as they navigate their academic career at KSU. SDS also communicates those accommodations and works with faculty to implement them in their classes.
However, waiting until you know you have a student with a disability to make accommodations is not the most effective means of serving our students. This is why, in January of 2016, KSU adopted a formal policy on accessibility. This policy states that all academic content made available to students via information and communications technology will fall under Section 508. In order to meet this standard, the USG uses the Web Content Accessibility Guidelines (WCAG) (level AA) from the World Wide Web Consortium (W3C). This means, as a faculty member, you are responsible for ensuring that all of your online course content is compliant with Section 508 and WCAG 2.2.
However, even a brief look at the WCAG standards can make this seem like an overwhelming task. To help faculty, the instructional designers in Digital Learning Innovations reviewed all of these standards, laws, policies, combined them with the needs of faculty and students, and simplified them into four main areas that we call the Basic Four.
Understanding the Basic Four
The Basic Four are four techniques you can implement to make the most impact in improving the accessibility of your course content for students with disabilities. Primarily, the Basic Four focuses on optimizing your content and documents for use with assistive technology. The video below provides an example of someone using assistive technology to read a document, but you can learn more about it in our assistive technology article.
Note: the Basic Four will help get you started with accessibility, but these techniques are meant to be a starting point to address the most pressing accessibility concerns. Once you’ve mastered these, there is always more you can do to make your course accessible.
1. Document Structure
The first piece of the Basic Four is document structure. Document refers to several types of content: Microsoft Word or PDF documents, HTML pages like D2L pages or SoftChalk modules or even presentation documents like PowerPoints.
Because documents are a visual medium, the primary goal is to make them accessible to students with visual impairments. Most often, this means setting up the document so that it can be easily read by a screen reader using these best practices:
Semantic (Heading) Structure
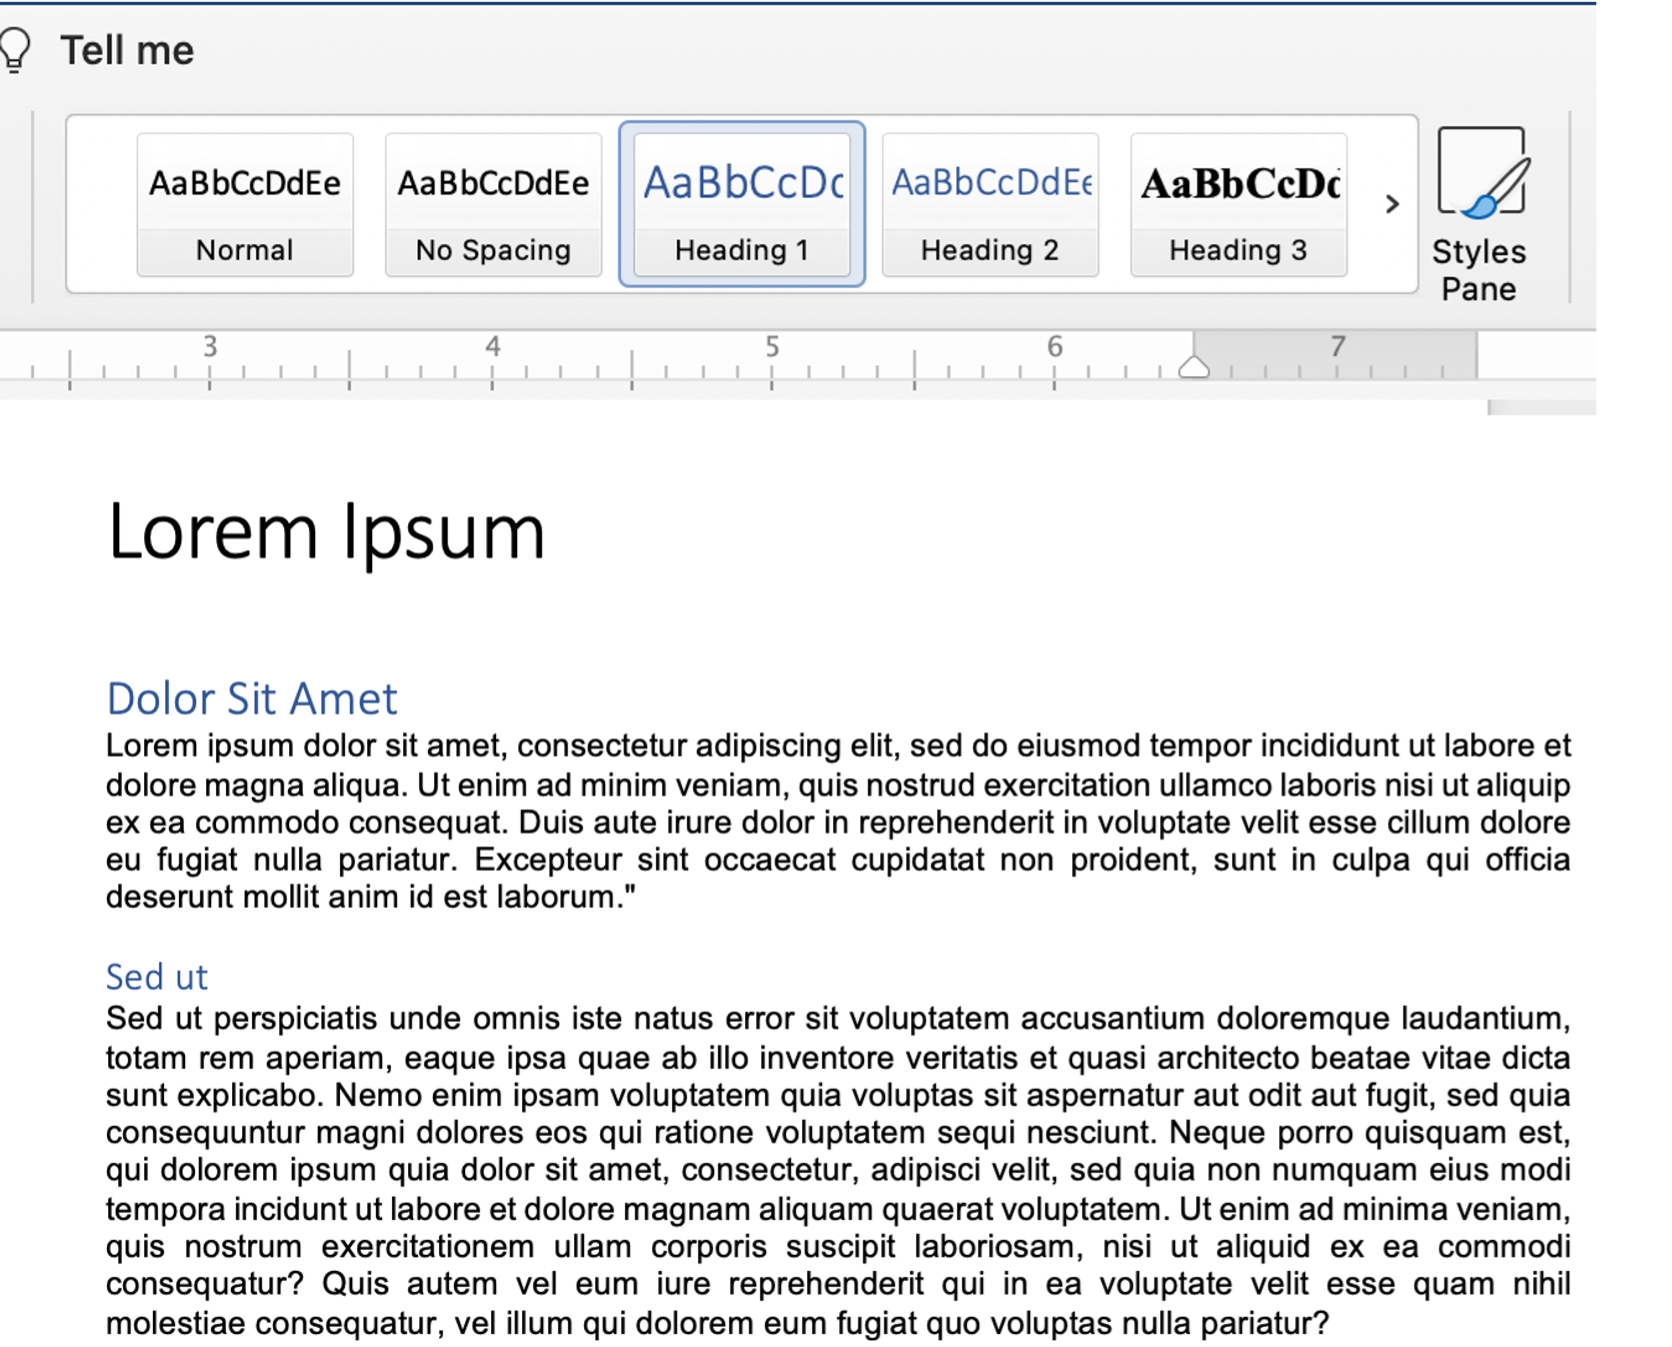
Documents of any length typically will include headings and sub-headings to visually represent sections of a paper. However, to make them accessible to students using a screen reader, you need to label them as Heading 1, Heading 2, or Heading 3 using the appropriate tool for the application, such as the Styles Pane in Microsoft Word. This communicates this structure to assistive technology and allows your students to quickly browse a document and find information.
It’s important to make sure that your headings are structured logically. Heading 1 is for major sections, Heading 2 is for a sub-heading, and Heading 3 for sub-sub sections, etc.
List Styles
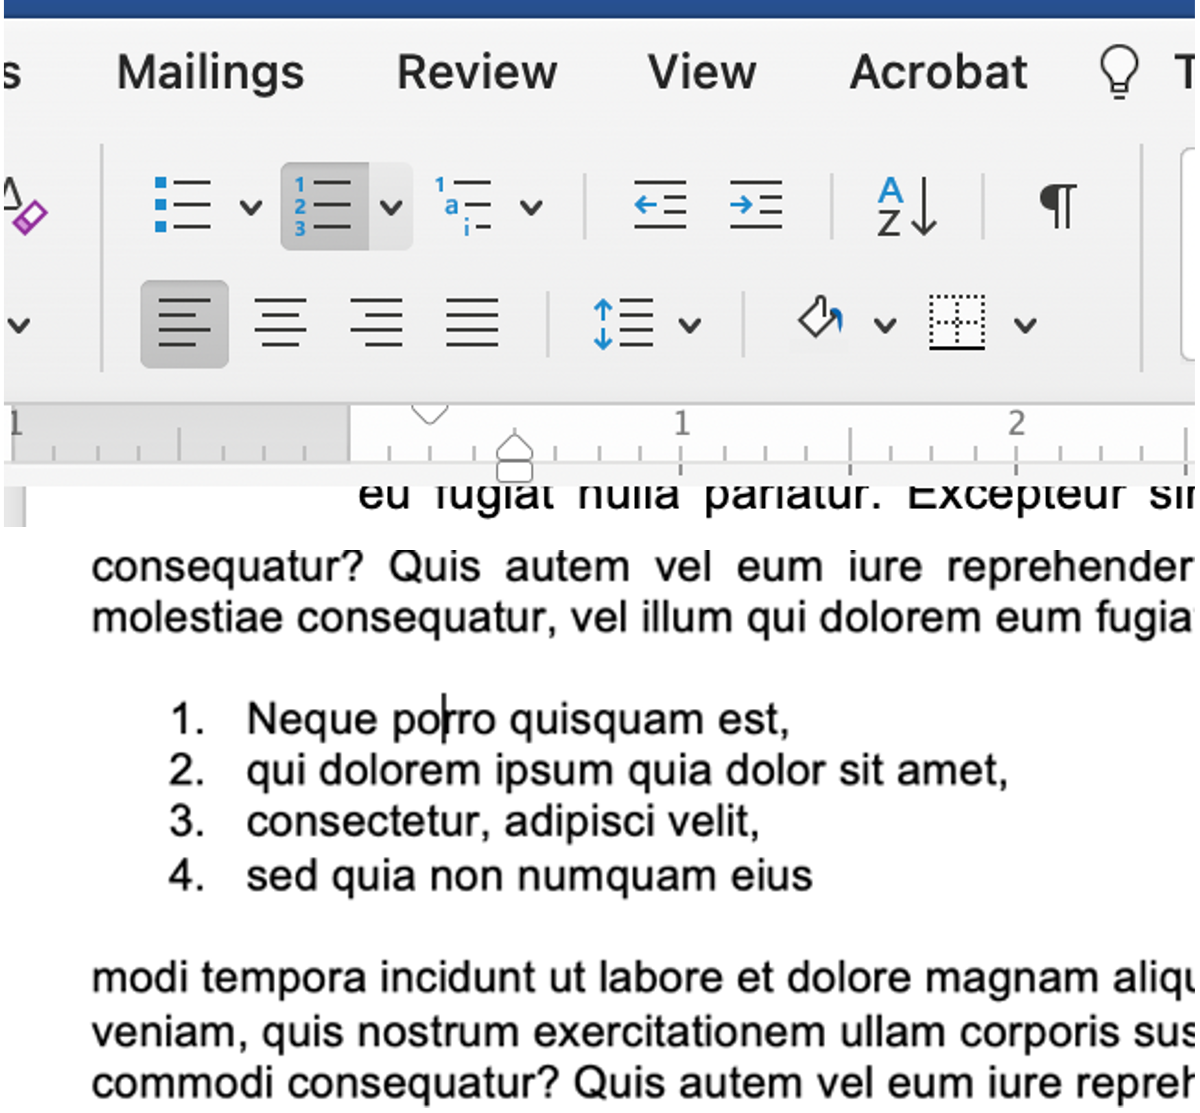
List styles refers to information that should be read in sequence. Typically, this is anything represented by a numbered sequence or a bulleted list. In order for a screen-reader to recognize a sequence and communicate that to the student, you’ll need to make sure to format these types of lists using the appropriate tool for the application, such as the styles menu in Word. Using hyphens or numbering them manually will not communicate to a student listening to this document that this is a numbered or bulleted list. To better understand, watch our video Reading Lists with a Screen Reader.
Tables
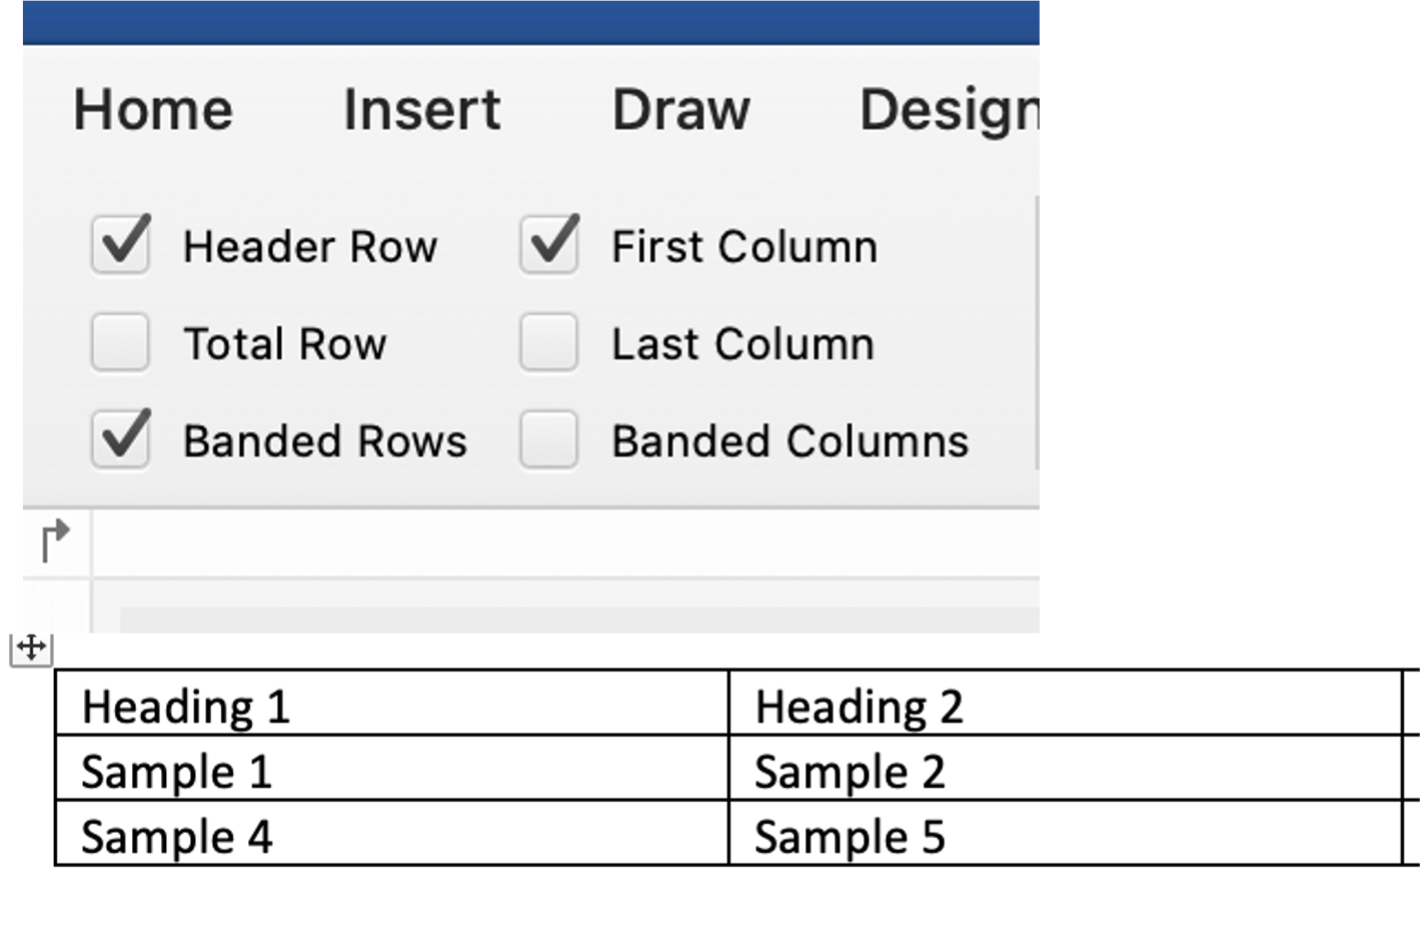
Because tables are typically used to represent data, a screen reader will want to represent any information set in a table that way, so it is important to only use tables for formatting data and not for aesthetic placement on a page. Also, make sure that your header row and/or first columns are set as headings using the appropriate tool for the application, such as the Table Formatting ribbon in Word. This way, the reader can communicate the data in that table to the student. To better understand, watch our video, How a Table is Read by a Screen Reader.
Contrast
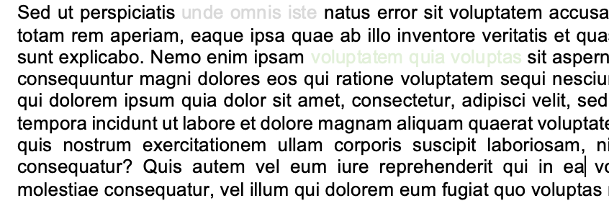
Individuals with visual disabilities may have trouble distinguishing colored text. Therefore, don’t use color for emphasis or to convey meaning, and if you do use colored text, make sure that the text has enough contrast to be seen. Colors that are too light may not be visible to many readers. This is especially important when you create links, as sometimes the links are auto-colored too lightly.
The standard for normal sized text in a document is 4.5:1. To make sure your text has the appropriate contrast, use the contrast checker provided by WebAim. The checkers in Microsoft Office, Adobe Acrobat, and Ally will also locate text with insufficient contrast.
Descriptive Links
Most visual readers are used to seeing lengthy URL links when reading text online.
A typically-sighted person will normally just skip over a link, but a person using
a screen-reader may be forced to listen to the entire link read aloud. This is why
it’s important to embed links within descriptive text for that link as demonstrated
in the next paragraph. It’s best to avoid “Click here” links, as this doesn’t describe
to the reader what the link is.
Why Use Descriptive Links? is a great video demonstrating the problem caused by improper links read by a screen
reader and the linked text is an example of a descriptive link.
2. Alt-Text
Alternative Text, or “alt-text”, is descriptive text associated with an image. Alt text typically allows the content and function of an image to be accessible to those with visual or cognitive disabilities. It is also frequently displayed in place of the image in browsers if the image file is not loaded.
Our How to Create Alternative Text article outlines how you can write and add alternative text for your images.
3. Media Accessibility: Captions and More
Video and audio content has become an integral tool for learning, especially in an online modality. According to WCAG standards, if a video has synchronized audio content, in order to make the audio portion accessible for students with hearing disabilities, it must include captions. Those captions must be:
- Synchronized: Text content should appear at approximately the same time that audio would be available.
- Equivalent: Content provided in captions should be equivalent to that of the spoken word.
- Accessible: Captioned content should be readily accessible and available to those who need it.
Additionally, audio recordings, such as podcasts, should always be accompanied by a detailed text transcript for people who cannot listen to it.
Additionally, videos that contain visual action that is not described in the audio portion of the video may also include a synchronized Audio Description in order to meet WCAG standards. While the great majority of instructional videos will not need this, if your videos contain action that is integral to the content of the course, you may want to consider whether or not your video should include this feature.
Our Accessible Videos Page will show you how you can add captions and create audio transcripts for your videos.
4. Choosing Accessible 3rd Party Resources
This may be one of the most difficult of the Basic Four. KSU makes a concerted effort to ensure that all supported resources (D2L, MediaSpace, etc.) are accessible. However, faculty are responsible for ensuring the accessibility of resources they require for the class that KSU does not provide. These may include:
- Publisher resources
- YouTube or Vimeo videos
- External Websites
All too often, faculty choose videos or resources that they believe are integral to their course, but find out later that they are not accessible. Sometimes it is possible to work with the owner of the resource to create accessible solutions for it. However, it is best to make sure your resources are already accessible before you choose to use them.
The best way to check on the accessibility of a publisher resource or external application is to learn to read accessibility statements and VPATs. We've also created a collection of VPATs, accessibility statements, and privacy statements of many popular third-party resources applications.
Further Training
For help mastering the Basic Four, we recommend our Accessible Teaching Essentials (ATE) three-week workshop.


